SimServer How To #2: Replicate any OPC UA Server with a Simulation Server
12.07.2022
In the previous article: SimServer How To #1, we described how you can create a new information model and import it to the Prosys OPC UA Simulation Server to be simulated. Now we will build on top of that experience.
In this article, we will show you how to replicate a Real-life Server in only three steps:
- Export a NodeSet from a Real-life Server using UaExpert.
- Import the Namespace into the Simulation Server. This will create a respective Address Space to the Simulation Server.
- Add simulation to see how the Instances work in practice.
So, when is this useful? In cases where you wish to develop or test a client application that is using the Real-life Server, but you cannot access it directly, because it’s in production use or you are working in another location, for example. With Prosys OPC UA Simulation Server, you can simulate the information model without having to engage the physical system. This way you can develop your applications against Simulation Server until you are able to use the Real-life Server.
Products needed
-
- This application is used to export a NodeSet from a Real-life Server.
- For exporting up to 20 Nodes, you can use the Evaluation version. Otherwise, you will need a license. You can contact us to get one.
-
Prosys OPC UA Simulation Server
- You will need the Professional Edition, but in case you don’t have it yet, you can get an evaluation license for this purpose by contacting our sales team.
Export a NodeSet from a server using UaExpert
To get a Namespace out of a Real-life Server, you will need to use UaExpert to connect to the server, find the correct Namespace, and export that selected Namespace. Please, see Unified Automation’s documentation on UaExpert for more information.
-
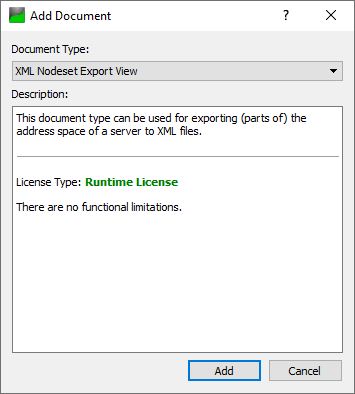
Add the XML Nodeset Export View to your project. This is done by adding a new Document from Document > Add… and clicking on Add Document. The following dialog will pop up, and you can select the correct Document Type from the drop-down menu.
-
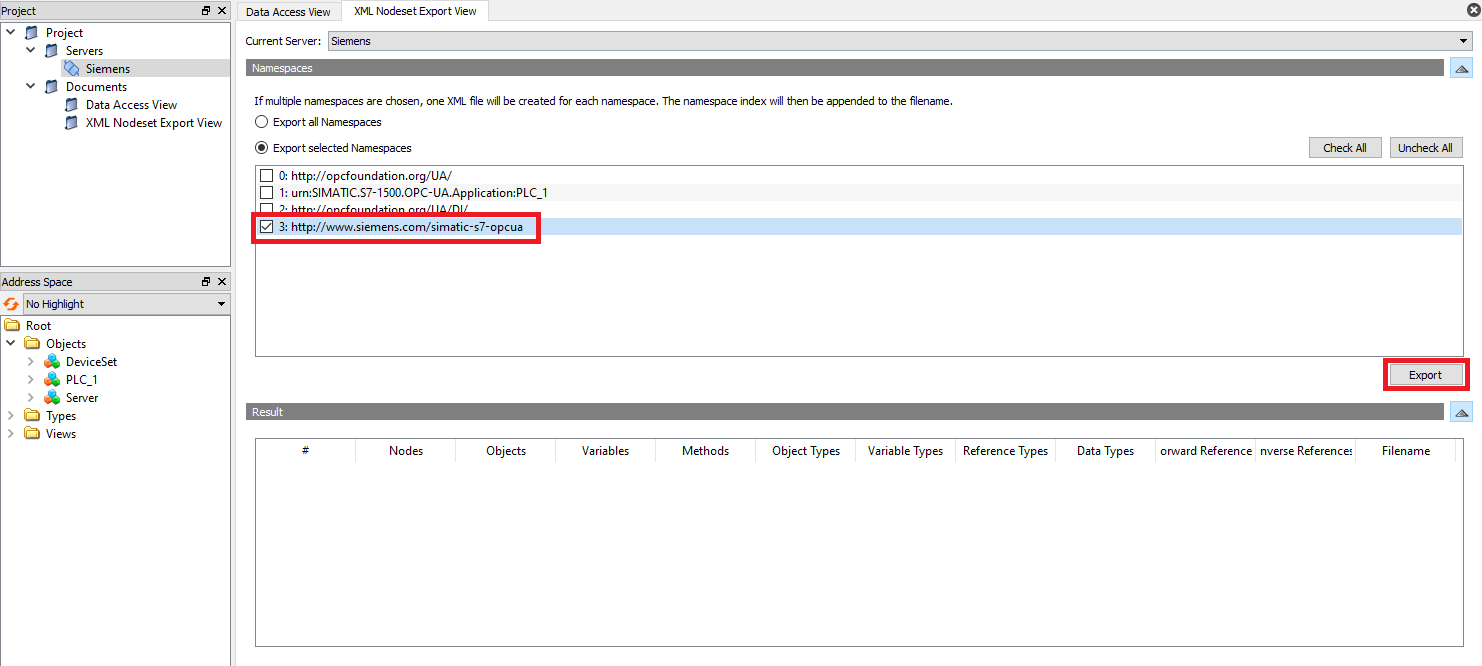
When you have managed to get into the XML Nodeset Export View, you can select all Namespaces you wish to export, and then click Export. You are then prompted to choose where you want to save the NodeSets. If you are exporting multiple Namespaces, each one of them will be saved into different NodeSet files.
Import the NodeSet into Simulation Server
Now that we have exported a NodeSet from the server, we can import it into the Simulation Server. When importing an information model, you will also need all the models that this model depends on.
-
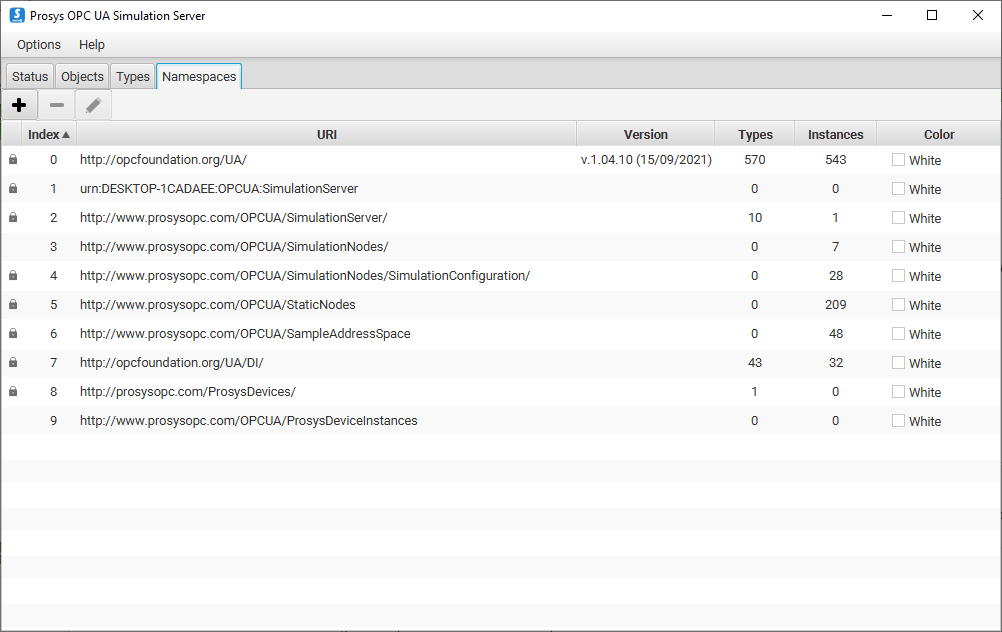
Start Prosys OPC UA Simulation Server, and go to the Namespaces tab.
-
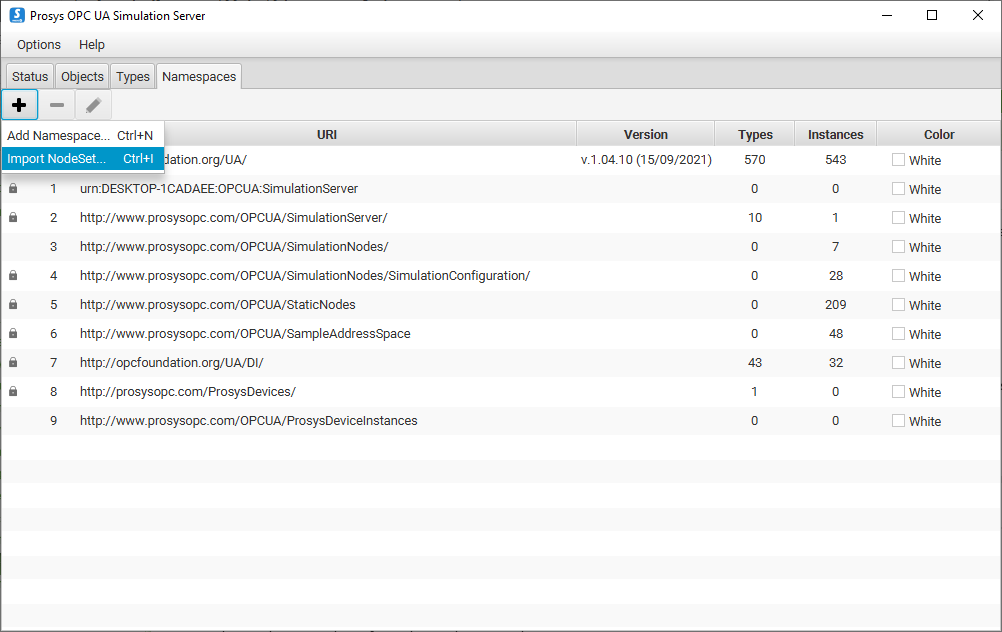
Click on the + button and select Import NodeSet.
-
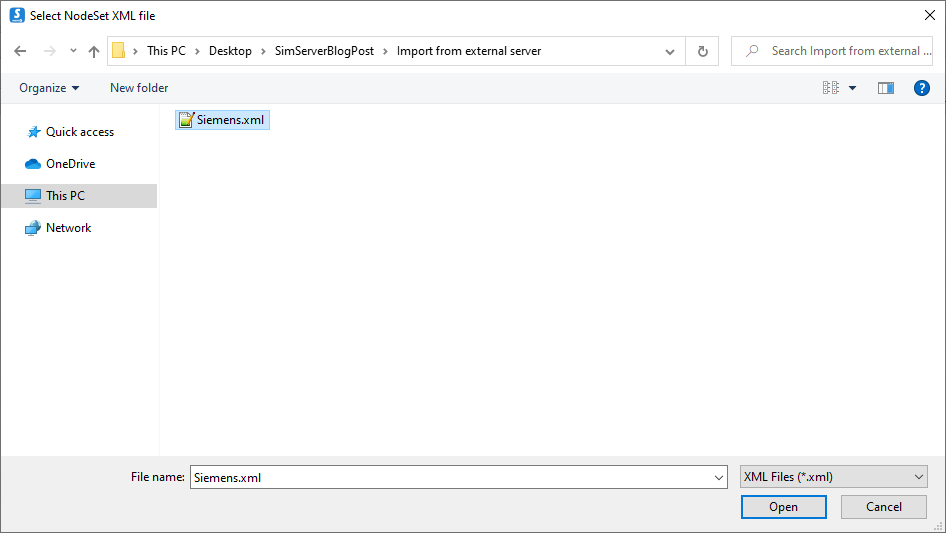
Find and select your NodeSet. If you know that your model has dependencies on other models, import them first. The information models need to be imported in the correct order so that every dependency already exists in the Namespaces when a new model with dependencies is added. If you are not sure which models you need, the Simulation Server will inform you of the missing models when you are trying to import your NodeSet. Depending on the size of the Namespace, the importing process might take very little or some more time.
-
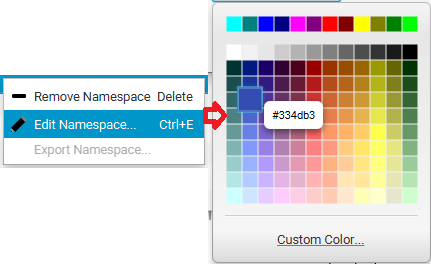
To find our Instances more easily, we can change the color of our imported NodeSet by double-clicking on the Namespace and changing the Color Identifier. We’ll select blue (#334db3).
Simulate Instances of the imported Namespace
We have now added the Instances from our imported NodeSet to the Simulation Server’s Address Space. The Instances will be highlighted with the selected color, so they will be easy to spot. Next, we will find some of those Instances and add simulated Values for them.
-
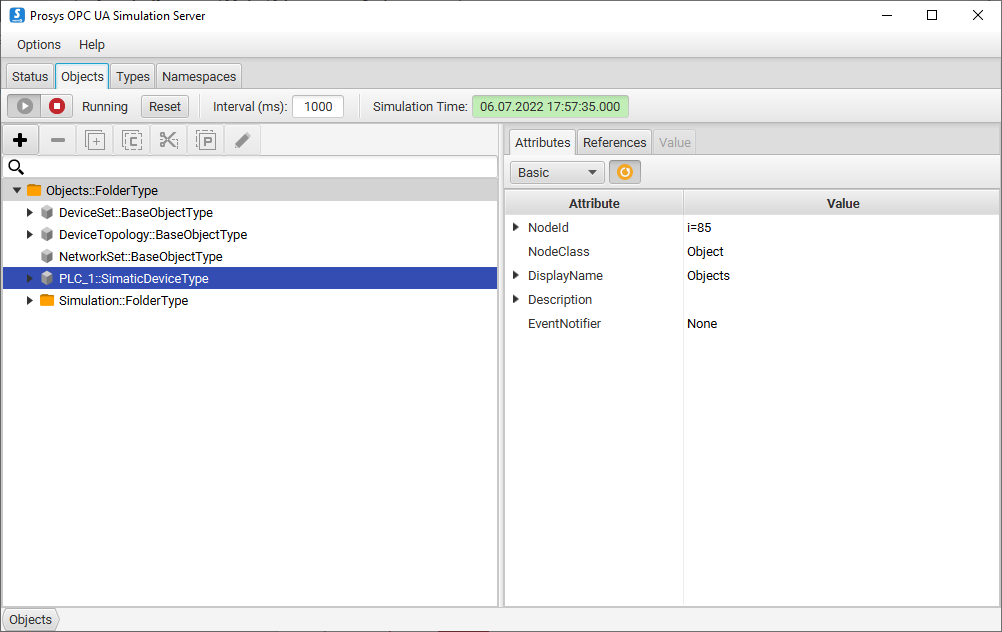
Go to the Objects tab.
-
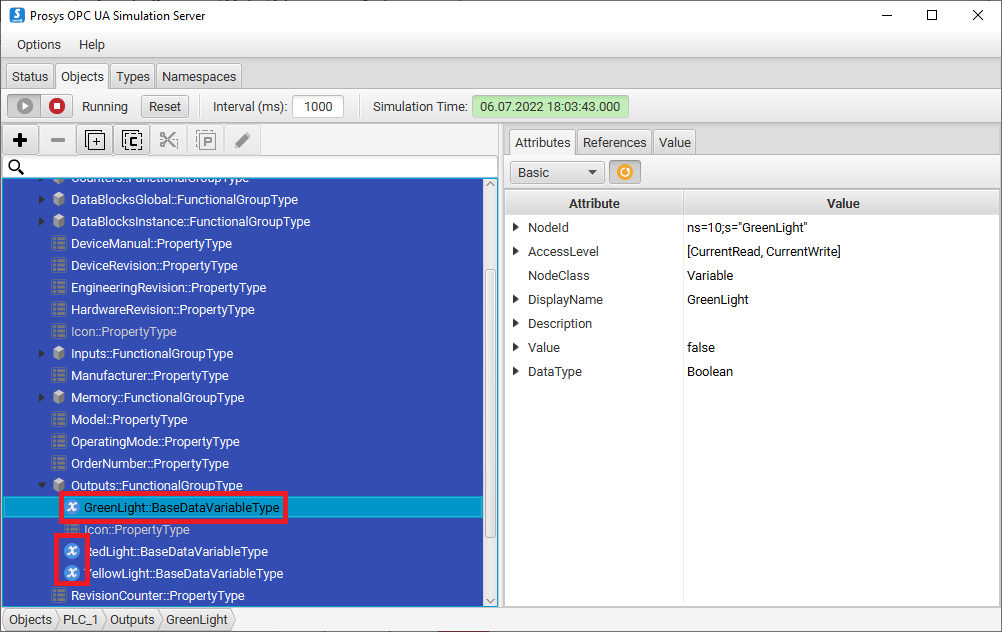
Find the Instances that you wish to simulate. To simulate a Value, you must find a Variable, because those are the only Nodes that can be assigned Values. The Simulation Server has a unique icon for Variables, on the left side of the Node’s name.
-
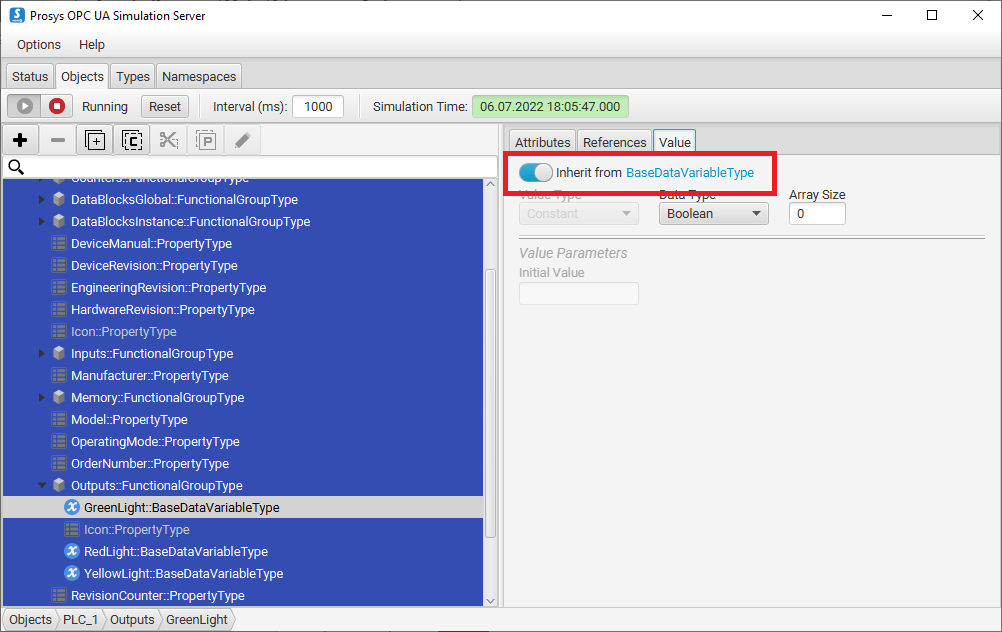
With your Variable selected, go to the Value tab on the right side of the view. All Variables inherit their Values from their parent Types by default, so first, you need to disable this Value inheritance by clicking on the slider.
-
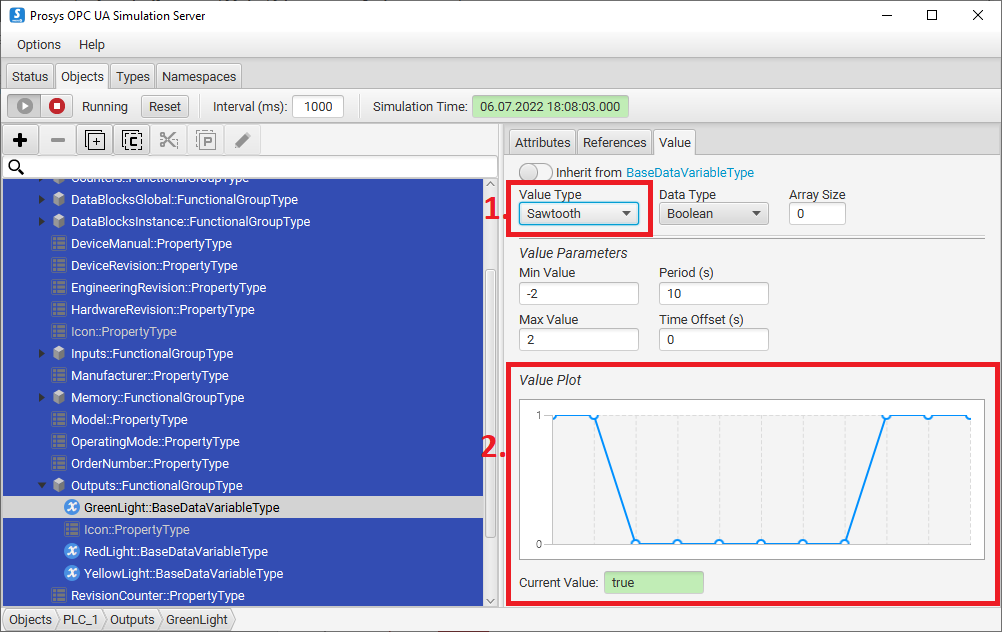
Every Value is simulated using a mathematical function. You can select the function that suits your purposes best from the Value Type (1.) selector. The Value Plot (2.) at the bottom will show you what the function looks like with the given parameters. The usefulness of the different Value Types varies with the Data Type of the selected Variable. “Constant” Value Type is the only usable option for a String type Variable, for example. For a Boolean type Variable, it is possible to use some of the mathematical functions, since the value will be rounded and set to either 0 or 1.
-
You can add simulation for other Instances as well, just follow steps 3 and 4.
Next steps
Now that you are simulating the Instances of the imported Namespace, you can use Prosys OPC UA Browser or UaExpert to see what the simulated server looks like. This gives you an opportunity to compare the simulated server to your Real-life Server from a client’s perspective.
If you want more information, help, or answers to your questions, be sure to contact us. To read and learn more about OPC UA and our products, please subscribe to our RSS feed.

Kaisa Hirvola
Creative Engineer
Email:kaisa.hirvola@prosysopc.com
Tags: OPC UA, Information Models, NodeSet, Simulation Server, Guides
comments powered by DisqusAbout Prosys OPC Ltd
Prosys OPC is a leading provider of professional OPC software and services with over 20 years of experience in the field. OPC and OPC UA (Unified Architecture) are communications standards used especially by industrial and high-tech companies.
Newest blog posts
Why Do Standards Matter in Smart Manufacturing?
The blog post discusses the importance of standards in smart manufacturing, envisioning a future where auto-configurable systems in manufacturing rely on standardized data formats for seamless integration and reduced costs, with a focus on the OPC UA standard family as a key enabler.
OPC UA PubSub to Cloud via MQTT
Detailed overview of the demo presented at the OPC Foundation booth
SimServer How To #3: Simulate data changes on a server using an OPC UA client
A two-part step-by-step tutorial on how to write data changes on an OPC UA server using an OPC UA client.